Monday, December 7, 2020

Baking Powder Biscuits - Or Why Life is a Series of Distractions

Yummy Traditional Baking Powder Biscuits ...

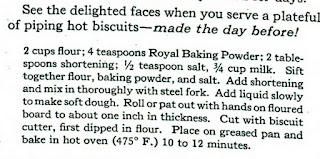
I sat down early this morning with my pot of tea, in the dark, got online and started researching 1920s issues of Ladies Home Journal, looking for a specific architecture article. As I "flipped" through various issues I stumbled across this add.


I used butter as shortening. Also, after just 10 minutes at 475 degrees, I'd say they were overbaked by about 1 minute. So next time I'll reduce the temperature to 450 and keep an eagle eye on them from 9 minutes on.

Finished Baking Powder Biscuits


Now I've got one more recipe to add to my repertoire.

Traditional Baking Powder Biscuit Recipe


They were really quick and easy. Next time I'm going to try making a double batch and then freeze half before baking. Later I'll pull them out of the freezer and see how well they back from frozen.


Cheers!


Saturday, May 9, 2020

Progress on the House - Connecting the Kitchens

Progress on the House - Connecting the Kitchens

The cottage and the house each have a lean-to at the back which each contained a bath/WC and a kitchen. Joining them together I won't be needing this redundancy and this provides the opportunity to create a new and much more functional kitchen and bath.

But the first step is to remove the structural wall that divides the 2 lean-tos. Time to call the mason.

Actually, the real first step was to demolish the interior walls and plaster ceiling in the cottage lean-to so we could get at the rest of it better.
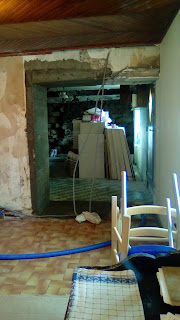
In the top image I'm standing in what was the kitchen for the cottage, looking towards a WC, shower/laundry space. In the second image I've torn down most of the interior walls.
Here is the space pretty much gutted. The far wall is the connecting wall in question. It's made of concrete block. It once had a door opening in it that was blocked up and there was also a clay tile flue.
The photo above shows the opposite side. This is the kitchen for the house and I need to try to keep it functional while I do the work. Fortunately there is only a cabinet against the wall to be demolished. I'll lose the work surface but my sink and stove won't be disrupted.
 The wall on its last day in existence.
 As it turned out, the wall was effectively non-structural in that it only had to carry its own weight, the roof being supported by the adjacent walls. So no new concrete lintel was required.

One more barrier brought down. Somebody bring me a croissant!


Progress on the House - Living Room Stone Wall

Progress on the House - Living Room Stone Wall
The attached cottage was added onto the house after the house was built. I'm guessing it was added in the 1950s. The cottage is built of concrete block around 8 inches (20 cm) thick whereas the house is built of granite with walls 2 feet (60 cm) thick.We wanted to open the stone wall that separates the front rooms of the house and the cottage. This kind of masonry is beyond me. So we brought in Francis LeFaou, a local mason who works with houses like ours on a daily basis.
 Here I've stripped away the plaster on either side so we can see better what we're dealing with. The first photo shows the wall from the house side. The stone had been plastered over as a final finish. But then some time later it had been given a second plaster board layer supported by thin metal studwork.
This is the same section of wall from the other side. I've outlined in yellow the opening. Apparently before the cottage was built there was a side door, which was blocked up with block.

 The mason has pierced a hole through which he is going to pass a temporary support beam if necessary. In the process he has uncovered an old flue.
 There must have been a fireplace or stove when the house was first built. This gap got filled with stone before its final concrete coating.
 Formwork is in place while the concrete sidewall and the beam above cure.
Forms stripped away. That's me with Francis. He did the hard work while I provided running commentary. We're standing in the front room of the cottage, seeing through to the front room of the house.
Here is the opening from the house. The blue hose on the floor is for plumbing. The main water line to the house passed through the wall where we wanted the opening. It had to be cut and routed through a temporary hose to do the work. Later, when we concreted the floor at the opening the plumber came back and put in a new permanent line under the floor.
After the masonry work I replaced the light steel studwork and finished off the opening with plaster board. Here we see from the house through to the cottage.


Friday, May 8, 2020

Progress on the House - The North Stone Wall

Progress on the House - The North Stone Wall

When the cottage attached to our house became available we bought it with the intention of opening it to the house itself. The top image shows front room, the north wall of the cottage when we got possession. The previous owner had been a smoker. You can see it from the discoloration on the walls.

There had once been a kitchen in the lean-to at the back of the cottage but at some point this had been dismantled and this small kitchenette in the front replaced it. To us it was useless. So we planned to tear it out and insulate the wall. In the process it became apparent the wall need much more work. These an old flue that could be removed and the wall could be strengthened. The flue is visible in the bottom photo in the set above.


 Here I have cast a new concrete base about 6" thick at the base of the old wall. On top of this I have begun building a new wall using Siporex brand aerated concrete blocks. These provide both structure and insulation.


 I have retained the largest and most interesting stone from the old wall and used it as a lintel over the central opening where the gas fireplace will go.

The wall is almost finished.
The block wall is complete and has been given a coating of a colored lime plaster. The trenches in the floor are where the gas line will be brought up to the gas fireplace.

I have left the tops of the alcoves open while we continue to pull some electrical cables.
Here it is in place. When I've finished electrical I'll put ceilings into the 2 alcoves and a crown molding across the top. The bases of the alcoves will be tiled to match the floor and I'll be putting shelves into them as well. Lots to do.